Wildlife & Trail Cameras Ireland
Ultimate Guide to Wildlife Cameras: Capturing Nature in its Purest Form
Wildlife cameras have transformed how we observe and interact with the natural world. Whether you're a wildlife enthusiast, researcher, or simply someone curious about the creatures that roam your backyard, wildlife cameras offer a window into nature that is otherwise difficult to experience. These motion-activated devices allow you to capture candid moments of animals in their natural habitats without human interference. From tracking elusive species to documenting unique animal behaviors, wildlife cameras are powerful tools for anyone looking to explore the great outdoors. In this guide, we’ll dive into everything you need to know about wildlife cameras, from how they work to choosing the best one for your needs.
What are Wildlife Cameras?
Wildlife cameras, also known as trail cameras or game cameras, are specialized devices designed to capture images or videos of animals without the need for a human presence. These cameras are usually equipped with motion sensors that trigger the camera to take a photo or record a video when an animal passes by. Most wildlife cameras are built to withstand harsh weather conditions, making them ideal for outdoor use year-round.
Why Use a Wildlife Camera?
Wildlife cameras have a range of uses beyond simple observation. Here are a few reasons why people choose to set up these cameras in nature:
- Wildlife Monitoring: Researchers and conservationists use wildlife cameras to study animal populations, track migration patterns, and monitor endangered species without disturbing their habitats.
- Backyard Nature Observation: Homeowners can set up wildlife cameras to capture footage of animals that visit their property. You might be surprised by what wildlife roams nearby, from deer and foxes to birds.
- Hunting: Hunters use trail cameras to scout game animals such as deer. By monitoring animal activity over time, hunters can plan more effective hunting strategies.
- Security: Some people use wildlife cameras as an additional layer of security for remote properties or rural areas, where they can capture footage of trespassers or potential threats to livestock.
Key Features to Look for in a Wildlife Camera
When choosing a wildlife camera, there are several features to consider to ensure you get the best performance based on your specific needs.
1. Camera Resolution
The resolution of your wildlife camera determines the quality of the images or videos it captures. Cameras with higher megapixels will produce clearer and more detailed images. For general wildlife observation, a camera with 8 to 12 megapixels is usually sufficient. However, if you want high-definition images for research or personal enjoyment, opt for cameras with 16 MP or higher.
2. Detection Range and Field of View
The detection range of a wildlife camera refers to how far it can sense movement and trigger a capture. A longer detection range, typically between 50 and 100 feet, is ideal for covering large areas or placing the camera in more open environments. The field of view (FOV) is also important, as it determines how wide an area the camera can capture in a single frame. Wider FOVs are better for open landscapes, while narrower FOVs work well for specific trails or feeding stations.
3. Trigger Speed
Trigger speed refers to how quickly the camera takes a photo or begins recording after detecting motion. Wildlife cameras with fast trigger speeds (0.2 to 0.5 seconds) ensure you don’t miss a fast-moving animal. This is particularly important for capturing smaller, quick animals like birds or squirrels.
4. Night Vision Capability
Many animals are most active at night, so a camera with night vision is essential for 24/7 monitoring. Wildlife cameras use infrared (IR) LEDs to illuminate the scene without startling the animals. Low-glow or no-glow IR cameras are less likely to spook wildlife, as they emit little to no visible light.
5. Weather Resistance
Since wildlife cameras are placed outdoors, they need to withstand various weather conditions, from rain and snow to extreme heat. Look for cameras with an IP (Ingress Protection) rating of IP66 or higher, which indicates that the camera is protected against dust and heavy water exposure.
6. Battery Life
Battery life is crucial, especially if you're placing your camera in remote locations where frequent access isn't possible. Cameras with long battery life can operate for months on a single set of batteries. Some models also support solar panels for continuous power, which is useful for long-term monitoring.
7. Storage and Memory
Most wildlife cameras use SD cards to store images and videos. The size of the SD card will determine how much footage the camera can store before it needs to be cleared. Choose a camera that supports at least a 32 GB SD card, and if you plan to record a lot of videos, opt for models with larger storage capacities.
Best Wildlife Cameras
There’s a wide range of wildlife cameras on the market, from budget-friendly models to high-end devices with advanced features. Here are some top options based on different uses:
-
Spypoint | FORCE-DARK | Camo: This camera comes with a built-in solar panel that ensures you never run out of power, making it ideal for remote, long-term wildlife monitoring. It features 12 MP resolution, no-glow night vision, and the ability to send photos directly to your phone through an app.
-
Spypoint® FLEX-M Twin Pack: The Spypoint FLEX-M makes observation more accessible through the ability to transmit photos and videos to your phone via a reliable dual-SIM LTE network connectivity. With a 28MP camera and a 0.4 second trigger speed, this trail camera will ensure you never miss any activity in your observed location; presenting crystal-clear images and videos in colour by day and black and white by night.
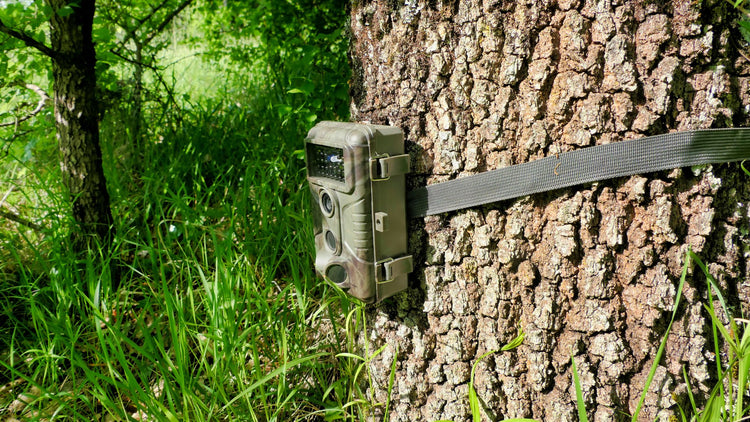
How to Set Up a Wildlife Camera
Once you’ve chosen the right camera for your needs, setting it up properly is crucial to getting the best footage. Here are some tips for effective camera placement:
-
Position the Camera at Animal Height: Place the camera at the height where the animals are likely to pass by. For larger animals like deer or elk, around 3 to 4 feet off the ground is ideal. For smaller animals like raccoons or rabbits, lower the camera to about 1 to 2 feet.
-
Choose the Right Location: Set up your camera near water sources, animal trails, feeding spots, or in areas with signs of animal activity like tracks or droppings.
-
Avoid Direct Sunlight: Point your camera north or south to avoid direct sunlight, which can wash out your images or trigger false captures due to heat or glare.
-
Camouflage the Camera: To prevent startling animals (or catching the attention of curious humans), use natural cover like branches or leaves to blend your camera into the environment. Most wildlife cameras come in natural colors like brown or camo to make this easier.
-
Check Your Camera Regularly: Depending on the camera’s storage and battery life, you’ll need to periodically check your camera to retrieve the footage and replace batteries. Some cameras have wireless features that allow you to view images remotely.
Conclusion
Wildlife cameras offer a unique opportunity to observe and study animals in their natural habitats without disturbing them. Whether you’re a nature lover wanting to capture local wildlife or a researcher gathering data on endangered species, there’s a wildlife camera out there to suit your needs. By choosing the right camera, setting it up in the ideal location, and maintaining it properly, you can experience the wonders of the natural world in ways you’ve never imagined.
Trail Cameras Ireland